 Auditius Free audio editor and multitrack studio in your browser
Normalize audio online
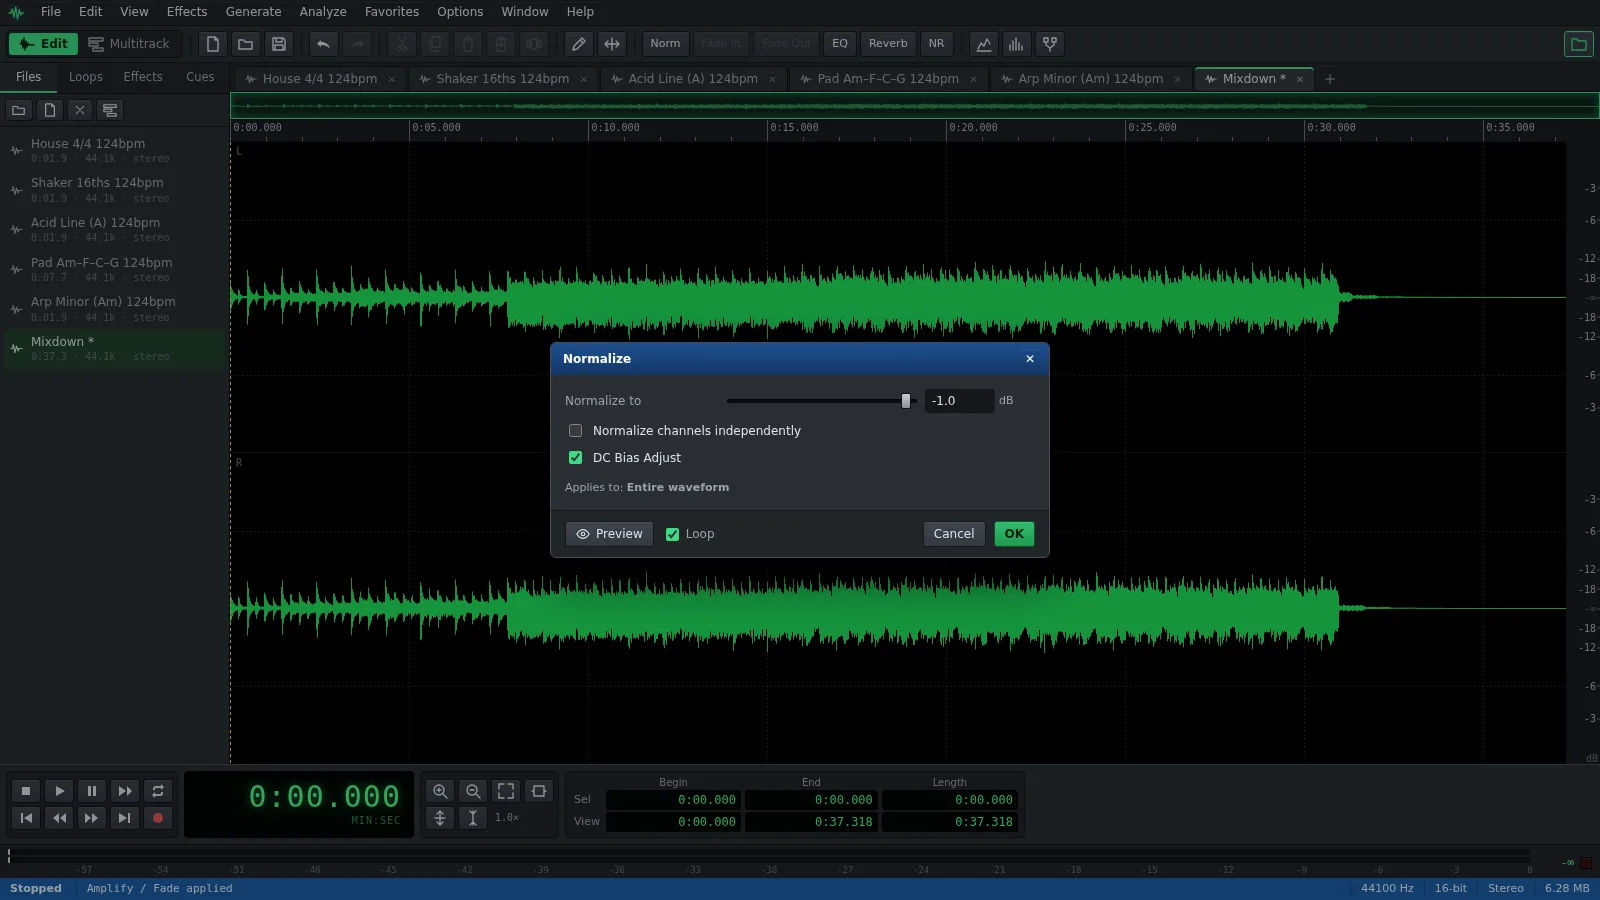
Normalizing finds the loudest peak in your file and changes the volume so that the peak lands exactly on the level you choose. Open your file, choose Effects ▸ Amplitude ▸ Normalize…, set Normalize to and click OK. Auditius does it in your browser, for free, without uploading anything.
- Free
- No install, no account
- Files never leave your computer
- English and Spanish
How to normalize an audio file
The Normalize window opens as soon as your file has loaded.
- Click Open a file to normalize, or use File ▸ Open… (Ctrl+O), and choose your audio file.
- Leave the selection empty to normalize the whole file, or select one part to normalize only that part.
- Open Effects ▸ Amplitude ▸ Normalize… if it is not already open.
- Set Normalize to. It goes from -30 to 0 dB and starts at -0.1 dB; -1 dB leaves a little headroom, which helps if you will export MP3.
- Keep DC Bias Adjust ticked, and leave Normalize channels independently unticked unless you need it.
- Press Preview to listen, then click OK.
- Save the result with File ▸ Save As… in the format you need.
What Normalize does, and what it does not
Normalize in Auditius is peak normalization. It measures the single highest sample and applies one fixed gain to the whole selection, up or down. Because the target is never above 0 dB, it does not clip.
It does not measure loudness the way your ears do. Two files normalized to the same peak can still sound different: a song with a few sharp drum hits sounds quieter than a heavily compressed one. Auditius has no loudness (LUFS) normalization.
- The distance between quiet and loud parts stays the same. Normalize does not compress or change the dynamics.
- One stray click can hold the whole file down. Remove it with Effects ▸ Noise Reduction ▸ Click / Pop Eliminator… or lower it by hand, then normalize again.
- A target below the current peak makes the file quieter. Normalize always moves the peak to the target, in either direction.
The two options in the Normalize window
Both options are about how the peak is measured.
- DC Bias Adjust, on by default, removes any DC offset before measuring: a constant shift of the wave away from the center line. An offset wastes headroom and can cause clicks at edits.
- Normalize channels independently brings each channel of a stereo file to the target on its own. Use it when one side was recorded quieter by mistake; avoid it on music, because it changes the stereo balance.
- Check the result in Analyze ▸ Statistics…: Peak Amplitude should show the value you chose, and DC Offset should be close to zero.
Normalizing many files at once
To bring a set of songs or episodes to the same peak, record the step once and run it as a batch. Start a script with Edit ▸ Scripts ▸ Record Script, normalize an open file with nothing selected, and end it with Edit ▸ Scripts ▸ Stop Recording.
Then open File ▸ Batch Process…, choose the open files or files from disk, pick your script and decide whether to export the results or open them as new files. Each file is measured on its own, so every result peaks at the same level.
Frequently asked questions
Does normalizing change the dynamics of a recording?
No. Normalize applies the same gain to every sample, so the quiet and loud parts keep their balance. To bring them closer together, use Effects ▸ Amplitude ▸ Dynamics Processing… before normalizing.
Should I normalize to 0 dB or leave some headroom?
0 dB is the maximum and does not clip in the file itself, but lossy formats such as MP3 can push peaks slightly over when they are decoded. -1 dB is a safe choice for MP3; the default -0.1 dB is fine for WAV and FLAC.
Can Auditius normalize audio to LUFS?
No. Normalize works on the peak level only. For a more even loudness between files, compress or limit them first, for example with Effects ▸ Amplitude ▸ Hard Limiting…, then normalize and compare them by ear.
Why did normalizing make my file quieter?
Because its peak was already above the level in Normalize to, so the gain went down. Undo with Ctrl+Z and choose a higher target if you wanted it louder.
Can I normalize only part of a file?
Yes. Select the part first: the peak is measured and the gain is applied only inside the selection. Listen to the edges afterwards, since the change in level can be noticeable there.
Audio tools
- Remove background noise from audio onlineRemove background noise from audio online for free: capture a noise profile, preview the result and export a clean file. Runs in your browser, with no uploads.
- Change the tempo of audio without changing the pitchChange the tempo of audio without changing the pitch: slow down or speed up songs, speech and loops in your browser. Free, nothing to install, and no uploads.
- Convert audio online: WAV, MP3, FLAC and OggConvert WAV to MP3 or FLAC online for free, or turn MP3, M4A and OGG into WAV. Choose bitrate or bit depth and export, all in your browser, with no uploads.
- Cut and join audio onlineCut and join audio online: trim MP3 or WAV files, remove unwanted parts and merge several recordings into one. Free, in your browser, with no uploads.
- Make loops and beats onlineMake loops online with royalty-free drum, bass and synth loops that follow your tempo. Repeat blocks, mix tracks and export WAV or MP3, free.
- Make audio louder onlineMake a quiet recording louder in your browser: boost the volume in dB, check the peaks so it does not distort and save the file. Free, and nothing is uploaded.
- Add a fade in and a fade out to audioAdd a fade in or a fade out to any song or recording in your browser: select the start or the end, pick a curve and save. Free, nothing to install, no uploads.
- Change the pitch of audio without changing the speedChange the pitch of a song or recording online for free: transpose by semitones or cents and keep the same speed and length. In your browser, with no uploads.
- Reverse audio online and play it backwardsReverse audio online for free: play a song, a voice or a sound effect backwards, or reverse only a selected part. Runs in your browser, with nothing uploaded.
- Make a ringtone from a song onlineMake a ringtone from any song online for free: pick the best 30 seconds, add fades, even out the volume and save it as an MP3. In your browser, with no uploads.
- Equalize audio online with a graphic equalizerEqualize audio online for free: boost the bass, tame harsh highs or clear up a voice with a 10-band graphic EQ, filters and presets. In your browser, no uploads.
- Compress audio online to even out the volumeFree online audio compressor: even out the loud and quiet parts of a voice, podcast or song with threshold, ratio and presets. In your browser, with no uploads.
- Add reverb to audio onlineAdd reverb to a voice, instrument or song online for free: choose a room, hall or plate preset, keep the tail and export. Runs in your browser, with no uploads.
- Record audio from your microphone onlineRecord audio from your microphone in the browser: watch the input level, record into a new or open file, play along in the multitrack and save as WAV or MP3.
- Remove clicks, pops and crackle from a recordingRemove clicks, pops and vinyl crackle from audio in your browser with the Click / Pop Eliminator. Preview the repair and save the result. Free, with no uploads.
- Fix clipped, distorted audio onlineFix clipped audio in your browser: spot the flattened peaks, rebuild them with Clip Restoration and keep the level below full scale. Free, nothing to install.
- Convert stereo audio to mono onlineConvert stereo audio to mono online for free: mix both channels with the Channel Mixer or make a true one-channel file. In your browser, with no uploads.
- Transcribe audio to text with AI, in your browserTranscribe audio to text with AI for free in your browser: word timings, click a word to hear it, SRT or VTT subtitles. Your recording is never uploaded.
- AI text to speech in Spanish and English, in your browserTurn text into speech with AI for free in your browser: Spanish and English voices, adjustable speed, pause tags and WAV export. Your text stays on your device.